Screenshot
From Audacity Development Manual
Displays the "Screen Capture Frame" dialog. This tool lets you capture all or part of your project window to an image file in PNG format. Click the button to pick the location where you want to save the screenshot. Then click the button corresponding to the part of the project window you want to capture. Most of these buttons are self-explanatory.
Screenshot Tools can be handy for capturing:
|
- Accessed by:
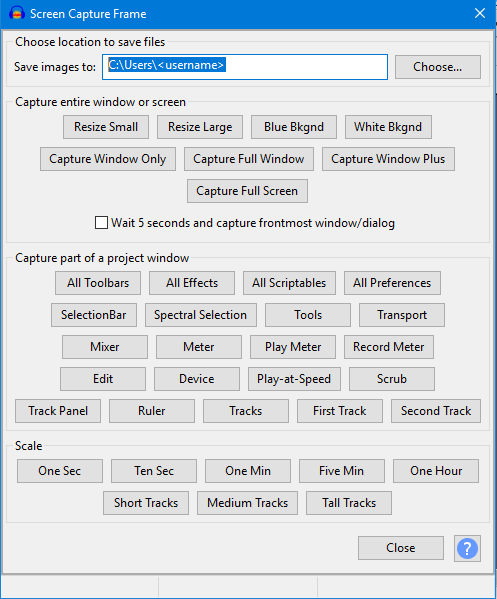
Capture entire window or screen
The buttons in this section enable you to take screenshots of particular parts of the screen.
Pressing any of these buttons will take the screenshot of that entity and place it in the location specified in Save images to.
- captures the window without its title bar.
- captures the window including its title bar.
- captures the window including its title bar, plus a small border region outside the window for context.
- captures the entire computer screen as you see it.
Capture part of a project window
The buttons in this section enable you to take screenshots of particular parts of the Audacity window such as toolbars and selected tracks.
Pressing any of these buttons will take the screenshot of that entity and place it in the location specified in Save images to.
Scale
The buttons in this section can be used to change the scale of the image prior to using one of the screenshot capture buttons above:
- The , and buttons zoom the project window horizontally so that a little more than the length indicated on the button is shown on the Timeline.
- The three buttons zoom all the tracks in the project to a preset height. For example, displays the tracks at minimal height so they only show the Audio Track Dropdown Menu and Collapse/Expand button
 .
.
Limitations
- Some individual parts of the interface cannot be captured, such as menus, and dialogs that do not allow you to click anywhere else while the dialog is open.
- As alternatives, you can use to print an image of the current tracks with the Timeline above, excluding the Track Control Panel and vertical scale. Or you can use the operating system commands to capture the entire screen or the active window, then open your favorite image editor and paste then save the image.