Manage Macros
Macros may be applied to either the entirety of the current project or to a selection of files using the command.
It is possible to use Noise Reduction in Macros but see Noise Reduction Tips for how the Noise Profile is captured.
Contents
- Accessing Macros
- Select a Macro
- Edit Steps in the Macro
- Shrink - reduced Macros Palette dialog
- Apply Macro
- Cancel
- Where Macros are stored
- Macros Examples
- Error: Batch command not recognized
Accessing Macros
- Accessed by:
- The menu , OR
- Using the button in the Macros Palette dialog.
Select Macro
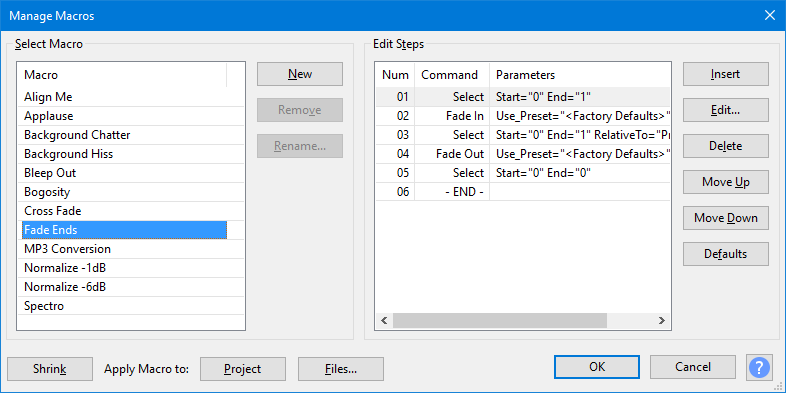
Select Macro contains a list of already defined Macros. You can define the name of a new Macro and select which Macro is active.
The left hand box in the dialog (labeled Select Macro) contains a list of already defined Macros. Until you add a new Macro, it only has a single built-in "MP3 Conversion" Macro. You can:
- Use the button to create a new Macro
- Use left-click (or use the Up or Down keyboard arrows) to select the Macro you want to work on
- Delete any user-added Macro with the button
- Rename any user-added Macro with the button
- : Add a new Macro to the list.
- : Remove the selected Macro from the list.
- : Rename the selected Macro.
- : not currently active
- : not currently active
Edit Steps in the Macro
Edit Steps lists the sequence of commands in order of first to last (End) for the Macro selected in the "Select Macros" box to left.
- The Macro can include a number of common Audacity functions and effects to be executed in any order you specify.
- To create an audio file as part of the Macro process you must include an "Export" command (such as Export as WAV).
- In many cases the parameters for each command in the Macro can be specified within the Manage Macros dialog.
You can:
- Add or remove commands for the selected Macro
- Change the order in which the commands execute in the Macro
- Edit the parameters for some effects in the Macro
Command
- : Insert a new command into the list
- : Edit the parameters of the currently selected command
- : Delete the currently selected command in the list
- : Move the currently selected command up in the list
- : Move the currently selected command down in the list
- : This button is only active when the Audacity supplied Macros are selected in the "Select Macros" list on the left, and will reset the Macro to its default values.
Editing an existing command
To edit an existing command double-click it, or use the Up or Down keyboard arrow to select it then press Space. The parameter settings dialog for that command will be displayed.
Inserting a new command
To insert a new command in a Macro, left-click or use the Up or Down keyboard arrow to select an existing command. The new command to be inserted will be placed above this selected command. Then press .
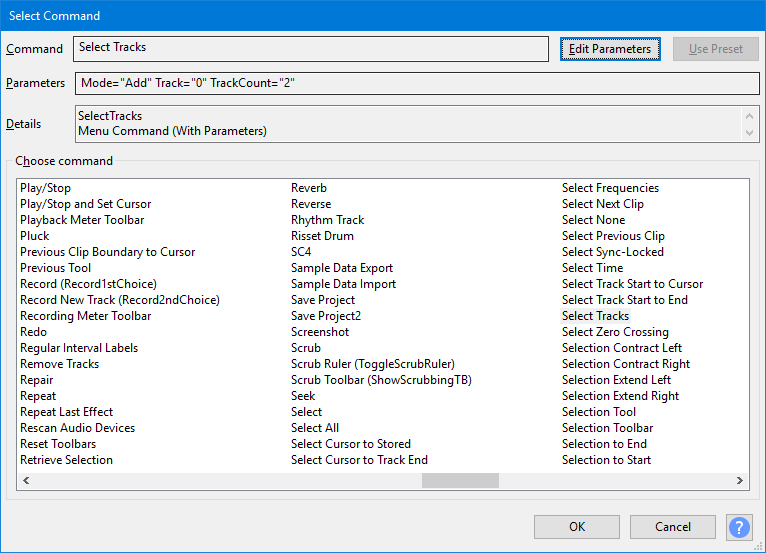
- The "Select Command" dialog appears, listing all the available commands. Double-click a command from the list to insert it in the "Command" box, as shown in the image below after inserting "Normalize".
- Alternatively, use the Up or Down keyboard arrow to select the command, then press Space.

- The full list of all commands, with descriptions, is available at Scripting Reference.
- Some 'scriptable' commands are particularly useful for Macros. See these pages for details:
- Extra Menu: Scriptables I - most commonly useful scriptables.
- Extra Menu: Scriptables II - less commonly useful scriptables, but also including Select and Set Track, which combine functionality of several scriptables.
- If the command has editable parameters, the button will be active. Clicking this button will bring up the dialog box for the effect where you can set the parameters as if you were applying the standalone effect.
- If you have previously created user presets for an effect you can use the to select one for use with that effect in the Macro.
- Choose in the effect dialog to accept the parameters you entered, or to revert to the default parameters.
- Choose in the "Select Command" dialog to add the command to the Macro.
Export commands
- There are four basic export commands available: Export as WAV, Export as MP3, Export as FLAC and Export as Ogg.
- See Apply Macro for details of naming and location of exported files.
| Parameters for export formats cannot be set in "Manage Macros". To configure export parameters for the Macro, click to access the Export Audio Dialog, click , set the parameters, press then the export. An audio track must be on screen in order to open the Export Audio Dialog. |
Special Export command
- Export2: there is also a special Export command Export2 which enables you to export to a specific target file and format. When using Export2 you have to give the full file name (including path and filename extension).
Note carefully that the filename is not dynamically changeable when running the Macro, once set in the Export2 parameters, so you may wish to create several Macros the Export2 each targeting different file locations, names and filetype.
Deprecated Export commands
The following two commands are now deprecated and may well be removed in future versions of Audacity. They were part of "CleanSpeech" (which has long been removed from Audacity).
- The Export as MP3 56k before and Export as MP3 56k after commands can be used respectively to export "before" and "after" MP3 files at 56 kbps bit rate at any point in the Macro processing. This allows you to compare the result of one or more effects, or provide files for different purposes with and without a particular effect.
- The name of the MP3 exported by the "Export as MP3 56k before" command is prefixed by "MasterBefore_" followed by the date and time. The name of the MP3 exported by the "Export as MP3 56k after" command is prefixed by "MasterAfter_" followed by the date and time.
Shrink - reduced Macros Palette dialog
Use the button to show a reduced Macros Palette dialog with a simple list of the existing Macros, enabling you to apply the Macros but not edit them.
This smaller version is useful for presets. It stays open after applying a macro, so it is a palette of custom functions, and you can pick another and apply that.
Using the button on this reduced dialog will return you to the full Manage Macros dialog.
For more details see the Macros Palette page.
Apply Macro to
Apply Macro to enables you to make a Macro operate on either your current open project, or a set of selected external files.
See Macros Palette for details of how these two buttons operate.
Cancel to exit the dialog
The dialog will remain open on the screen, but allowing you to perform other Audacity functions.
To dismiss the dialog simply click on the button
Where Macros are stored
Each Macro is automatically saved as a separate text file with TXT extension in the "Macros" folder in Audacity's folder for application data:
- Windows: Users\<username>\AppData\Roaming\audacity\Macros
- Mac: ~/Library/Application Support/audacity/Macros
- Linux: ~/.audacity-data/Macros
| In order to see the Macros folder on Windows, macOS or GNU/Linux, you must show hidden files and folders or type the folder location into your file manager's address bar.
|
Sharing a Macro
You can copy a Macro from your Macros folder and send it to another user, or to copy another user's Macro into your Macros folder so as to add to your own list of Macros. An updated list of Macros will be available next time you open "Manage Macros" in Audacity.
You can also edit your Macros using copy and paste between them.
| Comments in Macros: since Macros just ignore invalid commands you can edit your TXT Macros to add comments. We suggest using the # character to start your comment lines: "# this is my comment ..." |
Macros Examples
See the Macros Examples page for examples of using Macros.
Error: Batch command not recognized
- any command in the Macro uses a different text format than that recognized by the version of Audacity in use
- any plug-ins listed in the Macro are missing, in an incorrect location or are incompatible with the version of Audacity in use.
