Installing Effect, Generator and Analyzer plug-ins on Mac
| It is strongly recommended, when installing third-party plug-ins, that you thoroughly test the plug-in on non-critical project data before using it in production use on a live project. Many such plug-ins are known to fail or crash Audacity, see this Wiki page. |
| The folders that you need may be "hidden". To access them in Finder use or The is in the menu bar at the top of the desktop when Finder is active. |
Contents
- Installing Audio Unit plug-ins
- Installing Nyquist plug-ins
- Installing VST plug-ins
- Installing LADSPA plug-ins
- Installing LV2 plug-ins
- Installing Vamp plug-ins
- Uninstalling plug-ins
- How can I solve Audacity crashing after I add a plug-in?
Installing Audio Unit plug-ins
- Audio Unit effects support real-time preview.
To add a new Audio Unit effect, place it in either of the following system plug-in directories:
- ~/Library/Audio/Plug-Ins/Components (user plug-ins)
- /Library/Audio/Plug-Ins/Components (system-wide plug-ins)
Then use to enable the Audio Unit effects and load them into Audacity, For details see Manage Effects.
| Please note that not all of the Audio Unit effects that Apple supplies can be enabled in Audacity.
They will show listed as available in the New section of the Plug-in Manager but if you try to enable them you will get an error message telling you that they failed to register. This is an Apple issue and not an Audacity bug. This only affects a few of the Audio Unit plug-ins: AUScheduledSoundPlayer, AUMultiSplitter, AUMultiChannelMixer, AUMixer3D, AUMIxer, AUMatrixMixer, AUAudioFilePlayer and AUSpeechSynthesis. |
Installing Nyquist plug-ins
Nyquist plug-ins provide most of the optional effects underneath the divider in the Effect menu. They are also used to provide some of Audacity's built-in audio generators and analysis tools. A wide range of additional Nyquist effect, generation and analysis plug-ins can be obtained from Download Nyquist Plug-ins on our Wiki.
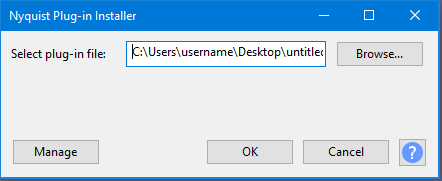
The easiest way to install a new Nyquist plug-in is to use the Tool Nyquist Plug-in Installer which is itself a Nyquist plug-in that simplifies the installation of other Nyquist plug-ins.
All Nyquist plug-ins are plain text files that have the filename extension '.NY'. This plug-in installer provides a file browser for selecting the plug-in '.NY' file, and then copies the file to the correct location. Once the plug-in has been installed, it may be enabled in the Plug-in Manager.
- Accessed by:
Installing a Nyquist plug-in manually
It is also possible to add a new Nyquist plug-in manually by adding it to the correct location that Audacity expects.
Place them in Audacity's "Plug-Ins" folder at ~/Library/Application Support/audacity/Plug-Ins.
To load the new effects into Audacity so they are available in the menu, use the Plug-in Manager: Effects, Generators and Analyzers dialog.
| Some Nyquist plug-ins could crash while processing very long audio selections (typically an hour or more). This is due to the plug-in using a large amount of memory and is a known issue in Audacity's current Nyquist implementation. Try using the plug-in on shorter selections instead. |
Installing VST plug-ins
Audacity supports almost all VST effect plug-ins on Mac including "shell" VST's that host multiple VST effects.
To install new VST plug-ins, place them in Audacity's "Plug-Ins" folder at ~/Library/Application Support/audacity/Plug-Ins.
- ~/Library/Audio/Plug-Ins/VST
- /Library/Audio/Plug-Ins/VST
- All paths specified by the "VST_PATH" environment variable.
You can install new VST effects into Audacity by using the menu item. This opens the Plug-in Manager: Effects, Generators and Analyzers dialog where you can select and enable the new effects then click to load them. Next time you launch Audacity the enabled effect(s) will be cached and you will not need to re-enable them.
| The list of effects in the dialog will include any detected VST instrument (VSTi) plug-ins (such as synths) and any real-time VST effects that are capable of changing audio data while it's being written to disk. Neither of these are yet supported and they will not load even if you enable or re-enable them in the dialog. |
Why do some VST plug-ins not work or display incorrectly?
Audacity will by default display VST effect plug-ins with a full graphical interface where the plug-in supplies this.
VST instruments (VSTi) (such as synths) and real-time VST effects (that change the audio data while it's being written) are not yet supported. These will not load even if you enable or re-enable them in the Plug-in Manager: Effects, Generators and Analyzers dialog. VST 3 plug-ins are not supported.
If any plug-in displays incorrectly, you can use the Manage button ![]() in the effect's dialog then choose Options... to open the
VST Effect Options for that effect. Then remove the checkmark from the "Enable graphical interface" checkbox
in the effect's dialog then choose Options... to open the
VST Effect Options for that effect. Then remove the checkmark from the "Enable graphical interface" checkbox ![]() Enable graphical interface and click . When you reopen the effect it will display a simpler tabular interface.
Enable graphical interface and click . When you reopen the effect it will display a simpler tabular interface.
| On Mac, Audacity is a 32-bit application so will not see 64-bit versions of VST plug-ins, even on 64-bit operating systems. |
If you experience a problem with a specific VST effect plug-in in Audacity, please contact us.
Installing LADSPA plug-ins
The LADSPA plug-in architecture was originally developed on Linux. Audacity supports LADSPA effects on Mac as well as GNU/Linux. You can download and install a set of over 90 LADSPA plug-ins. You can then choose which LADSPA plug-ins to enable in the Plug-in Manager: Effects, Generators and Analyzers dialog.
To install new LADSPA plug-ins, place them in Audacity's "Plug-Ins" folder at ~/Library/Application Support/audacity/Plug-Ins.
Then use to enable the LADSPA effects and load them into Audacity, For details see Plug-in Manager: Effects, Generators and Analyzers.
- The path specified by the LADSPA_PATH environment variable
- ~/Library/Audio/Plug-Ins/LADSPA
- /Library/Audio/Plug-Ins/LADSPA
Installing LV2 plug-ins
LV2 is a more advanced evolution of the LADSPA plug-in architecture which was originally developed on Linux. Audacity supports both LV2 effects on Mac as well as GNU/Linux. There are not yet many pre-compiled LV2 plug-ins for Mac, though it may be possible to compile some Linux LV2 plug-ins for other operating systems.
To add a new LV2 effect, place its complete ".lv2" folder (not the files alone) at the top level of any of the following searched for locations:
- ~/.lv2
- ~/Library/Audio/Plug-Ins/LV2
- /Library/Audio/Plug-Ins/LV2
- /usr/local/lib/lv2
- /usr/lib/lv2
- $HOME/.lv2:$HOME/Library/Audio/Plug-Ins/LV2:/Library/Audio/Plug-Ins/LV2:/usr/local/lib/lv2:/usr/lib/lv2
Then use to enable the LV2 effects and load them into Audacity, For details see Plug-in Manager: Effects, Generators and Analyzers.
Installing Vamp plug-ins
Vamp plug-ins are usually for analyzing audio so will appear under Audacity's Analyze Menu. You can do interesting things like attempt to track beats, note pitches, chords or frequencies. Any Vamp plug-ins whose output is suitable for a label track should work in Audacity on Mac. To add a new Vamp analysis tool, add the plug-in's DLL, DYLIB or SO file and any supplied category or RDF files to any of the Vamp search locations then enable the tool in the Plug-in Manager: Effects, Generators and Analyzers dialog.
Uninstalling plug-ins
Plug-ins can be removed using and then removing the file from the relevant file location, so that they do not appear again in Plug-in Manager.
Plug-ins shipped with Audacity can be found inside Audacity.app (in the Applications folder, or wherever you have installed Audacity). The path to the plug-ins is for example /Applications/Audacity.app/Contents/plug-ins. You can reach the Contents directory by right-clicking or Ctrl-clicking over Audacity.app and selecting Show Package Contents.
How can I solve Audacity crashing after I add a plug-in?
Please see this FAQ
Please see this Wiki page for Plug-ins that crash Audacity or fail to work properly in Audacity