
Have you ever heard of Crossfading? If not, then you must have at least heard about Mashups, otherwise known as Gapless playback or overlapping songs. Luckily, crossfading is just a more a technical term for a mashup.
- Sponsored Links -
Crossfading is a method for creating quick and smooth transitions between two audio tracks. It’s a type of audio effect that music composers and editors usually do to add a different taste to the audio. In this process, the first song fades out while the second song fades in and the music proceeds in a continuous loop. Sometimes, it is also utilized to fill any silence/gap in between two audio tracks. Click here to learn more.
Steps to create a crossfade in Audacity
You can seamlessly create a crossfade in between two tracks via the open-sourced music editor software Audacity. The following steps will guide you through the process of creating crossfade in Audacity.
There are five main steps in Audacity that need to be followed to create a smooth and exciting combined song.
1. Record the tracks
The very first step is of importing the tracks. Importing the track will create two audio tracks overlapped over each other. Thus, import the song which you want to listen to first and make the arrangements accordingly. Whether it is a mono or a stereo track, the process for creating crossfades is the same.
2. Position the tracks
You don’t need to arrange the tracks precisely at this stage; it will be done by default later.
- Randomly drag or position the number of tracks you want in your crossfade one after another using the Time Shift Tool.
- While crossfading, it is recommended to keep an overlap time of 5 seconds because the shorter transitions will sound better than longer pauses.
But, that’s a matter of taste and choice! Audacity lets you make the changes to your liking.
3. Align the tracks
Now is the time to precisely arrange the tracks. You can use Audacity’s Cut Preview to do the changes.
- Start of the second track is the point where the first track ends and that’s how the transition continues.
- In the case of a rhythmic song, we recommend positioning the second track more carefully and precisely, so you get the perfect beats lined up in the track and no silence is observed.
- Use the Zoom in/Zoom toolbar to align the tracks in Audacity.
4. Trim the tracks
- Trim or cut the unwanted part of the track by simply Edit>Remove Special>Split Delete.
- Remove the part which fades out or doesn’t suit the music beats.
Trimming is important when you have multiple tracks to be crossfade. So, make sure you trim the exact part in your exclusive track.
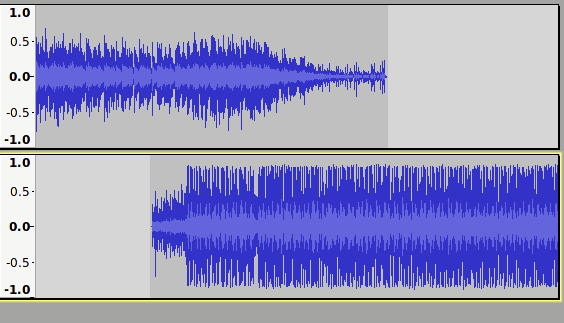
5. Apply fades in the tracks
- Use the Crossfade tracks effect to have the quickest upper and lower fades arrangement.
- Furthermore, the Adjustable fade effect applies the fade-out to the first track and fade-in effect to the second track making a complete loop.
This is how you can easily create a crossfade using the steps listed above for Audacity software.
Read more articles.


